• 1/2 cup mashed over-ripe banana1 VERY RIPE banana
• 1 cup self-rising flour
• 1 dash salt
• 1/2 cup walnutschopped
• 1/3 - 1/2 cup fresh blueberries
Instructions
Preheat oven to 350 degrees. Spray 2 mini loaf pans with cooking spray with flour like Baker's Joy.
Whisk the egg in a medium-sized mixing bowl. Add the sugar, corn oil, vanilla, milk and stir. Stir in the mashed bananas.
Stir the flour into the banana mixture. Add chopped nuts.
In a small bowl mix the Tablespoon of flour and the blueberries until berries are coated with flour. This will keep berries from "bleeding" in the bread. Gently stir the blueberries into the bread mixture.
Fill loaf pans about 1/2 to 3/4 full; don't be tempted to overfill, the loaves will be ugly.
Bake at 350 degrees for 35-45 minutes or until a skewer or straw inserted into the center of the loaf comes out clean. Cool on rack and serve with butter or cream cheese.
Hearty Beef Vegetable Bone Broth Soup – the BEST Ever!
This Hearty Beef Vegetable Soup with Bone Broth is the best soup I have ever eaten. It is not cheap, about $30 to make or $3.75 a bowl – but it’s a meal and worth every penny. Made with tender beef, fresh vegetables, and slow-simmered broth, it’s a full meal in a bowl. I am not a meat-eater, but this hearty soup could persuade me.
2-28 ozcans whole tomatoesThis is really good if you have home-canned tomatoes.
1-14.5 ozcan beef brothor more
1tspdried thyme
2bay leaves
2Tbsdried parsley or a hand full of fresh parsley
Salt and pepper to taste
1large clovegarlicmashed
6largecarrotspeeled and cut into large chunks
4medium potatoeswashed and cut into chunks with skins left on
3-4ears fresh corn cut off the cob
1largeoniondiced
2 stalks celerycut into small pieces
1-12 ozpkg frozen Lima beans frozen Lima beans (12 or 16 oz.)
Instructions
Sear the Meat1. In a large stew pot or Dutch oven, melt the lard over medium-high heat.2. Add the beef roast and oxtails, searing them for 4–5 minutes until browned on all sides. This helps lock in flavor.3. Once browned, remove the meat and bones from the pot and set aside to cool slightly.
Build the Stew Base4. To the same pot, add the canned tomatoes (use kitchen scissors or a knife to chop them directly in the pot).5. Stir in the beef broth, thyme, bay leaves, parsley, salt, pepper, and garlic6. Simmer this flavorful tomato broth over medium heat for 5–7 minutes while the meat cools.
Prepare and Simmer the Meat7. Once cooled, cut the roast beef into bite-sized chunks.8. Return the meat, oxtails, and any bones back into the pot.9. Reduce the heat and simmer gently for 30 minutes, allowing flavors to develop.
Add Vegetables10. Stir in the carrots, potatoes, onion, celery, Lima beans, and corn.11. Continue cooking for another 30 minutes, or until all vegetables are fork-tender.
Final Touches12. Remove any remaining bones from the pot.13. Carefully remove meat from the oxtails, discard bones, and return the meat to the stew.14. Stir well and keep warm until ready to serve. Serve with toasted rustic bread.
This is the best Corn Pudding I have ever tasted – and it is made with canned corn. If your budget is tight, this is a great dish to make, especially for those “pot-luck” dinners. It also has an amusing history — a friend Mary Anne gave me the recipe and now everyone thinks it is mine!
This Luscious Corn Pudding is so good you won't believe it is made from canned corn.
Prep Time15 minutesmins
Cook Time1 hourhr
Resting Time15 minutesmins
Total Time1 hourhr25 minutesmins
Course: Side Dish
Cuisine: American, southern
Keyword: corn pudding recipe, southern food
Servings: 8servings
Calories: 256kcal
Author: Chloe Tuttle
Cost: $10
Ingredients
1 15ouncecan corn, drained
1 14.5ouncecan creamed corn
¼teaspooncayenne pepepr (Optional ground black pepper)
½teaspoonsalt
1/4cupbutter(melted = 1/2 stick)
6Tablespoonssugar
6Tablespoonsflour
4eggs
2cupsmilk
Instructions
Preheat oven to 350 degrees. Grease a 9x12x2 inch baking pan.
Mix the corn and creamed corn. Stir in the pepper, salt, melted butter, sugar and four
In another large mixing bowl, whisk the 4 eggs. Add milk. Add the corn mixture and stir.
Pour into baking dish and fill almost full.
Bake at least an hour and often longer until the corn pudding does not "jiggle." You can insert a spoon or knife into the center part to see if it is runny. If it is, then it needs to cook longer. Sometimes it takes 1 1/2 hours to set and be done.
Notes
This recipe was given to me by friend Mary Anne. Take note - this Corn Pudding is definitely not diet food.
Big Mill B&B, Williamston, NC 27892 tel. 252-792-8787
Edible Flowers for All Seasons – How to Make Edible Flower Ice Cubes
Who can resist a pretty flower? Some of them, you can eat! Spring and Summer offer many edible flowers; fall has fewer, but they are beauties – and easy to grow.
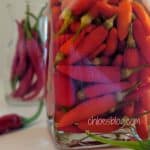
Hot pepper vinegar is a great condiment, and if you make it in small jars it makes for a great gift.
Prep Time15 minutesmins
Rest7 daysd
Total Time7 daysd15 minutesmins
Course: Condiments
Cuisine: American
Keyword: hot pepper vinegar, hot pepper vinegar recipe, how to make hot pepper vinegar
Servings: 8small jars of Pepper Vinegar
Calories: 65kcal
Author: Chloe Tuttle
Ingredients
1poundof small hot red peppersthe peppers must fit into the mouths of the jars
1/2gallondistilled white 5% vinegar
Instructions
The small individual 875 ml wine bottles are great for making this pepper vinegar; you can also buy pretty decorative bottles. Be sure to use only clear glass jars. Wash jars and remove labels if there are any. Basically, any jar will work – some folks use Mason jars. I like to use small jars so that I have more bottles of pepper vinegar to give away.
Trim any long stems on the peppers. Pack as many peppers as you can get into the jars. Use the handle end of a wooden spoon or a chopstick to stuff the peppers in the jar, being careful not to damage the peppers. If you have sensitive skin, wear gloves.
Using a funnel, fill each jar with the distilled vinegar, covering the peppers. Set on a shelf and in a few weeks you will have glorious hot pepper vinegar. You can refill the jars several times.
Biscotti is perfect for those who don’t want a super sweet confection. I like to bundle up a few Biscotti, tie them up with a festive ribbon, and take as a house gift or as my donation to the the Christmas party.
3largeeggsif mixture is too dry you may need to add another egg
2largeegg yolksreserve the egg whites
1teaspoonvanilla flavoring
1teaspoonalmond flavoring
1½cupslivered almondsreserve ¼ cup
Zest of one lemon or lime
1/2cup sweetened, dried cranberrieslike Craisins
Instructions
Preheat oven to 275 degrees. Grease a large, heavy cookie sheet.
Mix flour, sugar and baking powder in a large mixing bowl. In another large bowl mix eggs and egg yolks together. Add vanilla, almond flavoring, 1 ¼ cup of the nuts, cranberries, and the zest to the eggs.
Gradually add the dry mixture to the wet mixture, stirring until just barely blended. You will have to use your hands and perhaps add another egg or you can use some of the reserved egg whites if the mixture is too sticky to form.
Using greased hands, form dough into three 4-inch by 9-inch (or thereabouts) rolls that are 2 inches thick. Mixture will be sticky and you will have to use your hands. Using a greased spatula, gently place the “rolls” on greased cookie sheet, making sure the rolls are several inches apart.
Press reserved almonds on top of the shaped dough.
Bake 20 to 25 minutes or until the dough will hold together. Remove from oven and cool slightly. (You must not cool the biscotti too much because they will get too hard to cut). When cooled slightly, gently slide the rolls to a floured cutting board and gently cut through each roll at an angle into 1½- inch pieces. Turn each piece on its side and place on the cookie sheet.
Bake again for 10 to 15 minutes. Remove from oven and turn each piece onto another side. If you prefer harder biscotti, turn biscotti and bake for 5-10 more minutes.
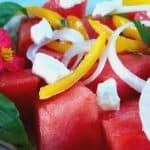
Calling all watermelon lovers!! This Watermelon Salad is a beauty. I adapted this recipe from one in the June, 2017 issue of “Our State Magazine,” the same magazine that did a wonderful story about Big Mill in their August issue.
1sweet onion like Vidalia or 1 red onioncut into very thin rings
4ouncesof Feta Cheeseor goat cheese, crumbled
Juice of 1 limeabout 3 Tablespoons
2Tablespoonshoney
¼teaspoonsalt
Freshly ground black pepper to taste
Instructions
This is a “make now and eat now” salad. If you dress it, you eat it. You can cut the parts of the salad early, but do not amalgamate it until you are ready to eat it.
Cut the watermelon into large chunks and lay it out on a plate lined with paper towels to remove some of the excess water. I do that when I am making watermelon skewers for my B&B guests. It keeps the watermelon from weeping into the dish.
Cut watermelon again into cubes about 1½" large. Put cubes of watermelon, pepper strips and onion rings into each salad bowl. Add crumbled cheese. For each salad, cut 1 basil leaf and 1 mint leaf into very thin strips and place on top of each salad.
Wisk together the lime juice, honey, salt and pepper.
Garnish with an edible flower like a begonia or nasturtium. Dress salad just before serving.
Instead of individual salads you can make one large salad if you prefer. Also do not dress this until just before serving.
This salad recipe is adapted from a Watermelon Salad in "Our State" magazine.
Notes
This salad needs to be made just before serving.
In eastern North Carolina, we do many things with watermelon. We also are very picky about where we buy our watermelons. Folks around here swear by Rocky Hock watermelons and cantaloupes. Rocky Hock is a small, rural area of the Chowan River – folks say the sandy soil is the reason these melons are so good.
I have always wanted to write a cookbook that told the stories behind the recipes.
Sign up to get the free cookbook with your email address below
One time, I took a month off and house-sat for my friends in the Florida Keys. Well, as usual, I was sidetracked with the beauty of the area. I would make a recipe and spend all my time taking photos of the food. I do love to photograph food – it doesn’t whine or wiggle or complain that the picture makes it look fat.
Friend Jody has helped me FINALLY produce a wee digital cookbook that features some of my favorite Southern recipes; we call it Chloe Ann’s Farm Life Recipes. My folks grew up in an area very close to Big Mill B&B called Farm Life, so that seemed like a lovely homage.
While we were pulling this book together I was happy that I took the pictures. I’m guessing all these recipes will hold memories for those of us who grew up in the South.
I hope you enjoy it and I promise there are more to come.
Luscious Candied Figs Are the Food of Kings
One of the great things about late summer is that we have luscious figs. And when they ripen, they all ripen.
One of the great things about late summer is that we have luscious figs. And when they ripen, they all ripen. Candy some of them to preserve them.
Prep Time1 hourhr
Cook Time1 hourhr
Rest6 daysd
Total Time6 daysd2 hourshrs
Course: Snack
Cuisine: American
Keyword: candied fig recipe, candied figs
Servings: 24servings
Calories: 123kcal
Author: Chloe Tuttle
Ingredients
2cupssugar + optional 4-5 Tablespoons
2cupswater
½gallonripe figs-small figs like Brown Turkey work best. Use figs that have stems
Instructions
Day 1:
Add the sugar and water to a large cooking pot. Boil gently for 10 minutes, stirring occasionally. Wash figs, do not remove stems.
Add the figs to the sugar syrup – figs will not be totally covered. Bring to a slow boil and boil gently for 45 minutes. Don’t worry about stirring the figs. They will release more juice and then there will be more liquid. They are so fragile it is best not to stir them now, but do keep an eye on them. After 45 minutes remove pot from heat and set aside. Cover pot.
If you feel you must stir the pot, use a wide spatula and gently lift the figs. Remember they are fragile.
Day 2 & 3:
Boil gently until sugar is almost gone, checking often. For me this took several hours so I set the temperature on low.
Gently remove the figs from the pot and place them on the cooling rack set on a large cookie sheet with sides. The figs will drip.
Preheat the oven to 200 degrees. Turn off oven. Place the cooling rack and cookie sheet with the figs in the warm oven. Leave figs for several days to dry. You can keep heating oven again to 200 degrees if needed. I did not dry my figs totally. They are so tough if you do that. I think I like them half dry.
Optional: When figs are dry enough for you, sprinkle them with the extra granulated sugar. They are already sweet but this keeps them from sticking together so much. Store figs in refrigerator in an air-tight container or zip lock bag.